Winter sowing is the method of sowing seeds is a low to no-cost and effective way to start your spring seeds ahead of time. This method saves space, uses recycled materials, and lets Mother Nature do most of the work.
What is Winter Sowing?
Winter sowing uses a container such as a plastic water/milk jug or a 2-liter soda bottle, which acts as a mini greenhouse. The container will let the sun in for warmth and protect the seeds from harsh conditions and animals. Rain can get in the top of the container, so the soil doesn’t completely dry out. The container provides an environment where the seeds germinate naturally without much intervention from the grower.
What are the Benefits of Winter Sowing?
- No need to use any indoor space
- No need for grow lights or heat mats
- Repurposed materials already around the home
- Use materials that can be recycled after plants are transplanted
- Mother Nature provides the warmth and moisture
- Cost-effective – little to no money needed
- Growers get a jump start on the season
No hardening off
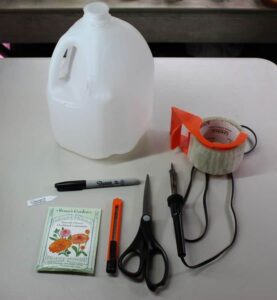
Materials Needed:
- Milk or Water jugs (2-gallon size work great, 2 Litre soda bottles or other recycled containers such as take-out containers with a lid) Containers need to be able to let sunlight in
- Potting soil (no need for seed starting mix) that is well-draining
- Permanent Marker (to label the outside of the jug)
- Seed Label (for inside the container)
- Tape (packing tape or duct tape )
- Scissors
- Razor knife *optional
- Soldering iron *optional
- Small hand sprayer * optional
**Note** For this article I am showing my process using a 2 gallon water jug. That is what I personally use, but you can use what works best for you.
Step 1: Create holes in the bottom of the container for proper drainage.
For this first step, I prefer to use a hot soldering iron. This particular item is not necessary, but I find it is very handy. I like to use it because it saves me time, especially when preparing several jugs to plant. You could use a screwdriver and heat the end to make it hot or use scissors to make several holes in the bottom of the jug. Drainage is essential to winter sowing. Without proper drainage, the seeds will rot.
Some may prefer to put a few holes in the top of the jug to allow more moisture or air to flow in. I have done it both ways with success.

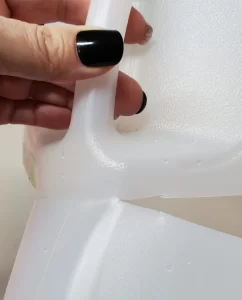
Step 2: Cut the Container almost the entire way around horizontally.
I use a razor knife to make a small slit. I find it easier to create the slit so the scissors slide in easily. You can start your hole with the scissors if you like. Use the scissors to cut around the jug to the other side of the handle. The top and bottom will still be connected right below the handle.
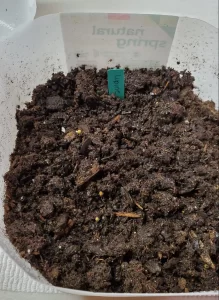
Step 3: Fill the Jug with pre-moistened potting soil
You will want to provide at least four inches of potting soil in the bottom of the jug. Four inches of potting soil works best for me. If you wish you can add a little more soil. I pre-moisten my potting mix before filling the jugs. This I know there is plenty of moisture to get the seedlings off to a good start. It is not necessary to use seed starting mix. I recommend using regular-quality potting soil. Nothing fancy is needed.
**Note** If you live in an area that does not get much snow or rain, you should check your jugs every few days to see if you need to spray them through the top hole.
Step 4: Plant seeds according to instructions on the seed packet
Follow the planting instructions on the back of the seed packet. It should tell you the depth to plant the seeds. Gently cover the seeds with soil (unless the instructions state otherwise). I then use my small hand sprayer to do a final watering of the seeds once planted. You can use a regular spray bottle if you have one. You to gently water so the seeds are not washed out of place.
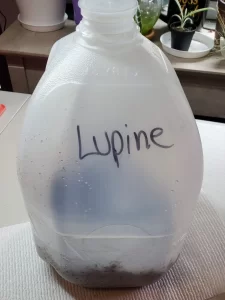
Step 4: Create a label for the inside of the Jug
Putting a label inside helps keep track of what you planted. You will also use a permanent marker to write the name of the seeds on the outside of the milk jug. However, this can wear off in the elements, so marking it inside and outside the jug is best. I can’t count the many times I did not label inside, and when the outside wore off, I had to play “Guess what this seed is.” Putting a label inside the milk jug when planting seeds is helpful. This way, you can keep track of what you planted. You should also use a permanent marker to write the name of the seeds on the outside of the jug. However, the writing on the outside can wear off due to exposure to the elements. Therefore, marking the inside and outside of the jug is best to avoid confusion. I have experienced situations where I did not label the inside of the jug, and when the outside label wore off, I had to guess what seed I had planted.
Step 5: Secure the top to the bottom of the milk jug by putting tape around it.
For this step, I prefer packing tape, which is not super expensive but more manageable to peel off than duct tape. Duct tape does work well, but it’s harder to get off when it’s out in the sun, and it’s time to take out the plants. I don’t use expensive high-quality packing tape like when you are shipping something. Just something that seals well enough for the duration of the project.
Once the seedlings have reached a good height,”For this step, I recommend using packing tape as it is more manageable to peel off than duct tape and not very expensive. Duct tape is also effective, but it is harder to remove when exposed to sunlight, especially when it’s time to take out the plants. I suggest using simple packing tape that seals well enough for the duration of the project. Once the seedlings have grown to a good height, you can peel back the tape to let them get more air during the day. However, keep an eye on the temperature as you may need to cover them back up at night.” you can peal back the tape for them to get more air during the say. However, keep an eye on your temps as they may need to cover them back up at night.
That's All There is to it!
Congratulations if you have decided to try the winter sowing project! You will be delighted in the spring when you see all the plants you have grown. The beautiful flowers and tasty vegetables will be a great reward for very little work. Most of the items needed for the project are common household items or can be purchased very inexpensively at a dollar store. Seeds can also be purchased inexpensively, and you can get a quality bag of potting soil for $8-10 depending on the size.
Visit my list for Seeds to Winter Sow.
See our video on Winter Sowing
1 thought on “Winter Sowing – The Ultimate Guide”